Using computer groups
Since OCS Inventory NG 1.02, you can create computer groups. Computer groups can be used to sort your computers, add custom parameters or deploy packages on these computers.
Computer groups are created using various criteria search, see queyring inventory results for more informations.
You can create dynamic, static or redistribution server groups.
Enabling computer's group feature
To be able to use computer groups, you must first enable its feature.
To do so, go to your management server's configuration menu, and select the "Groups" configuration screen:
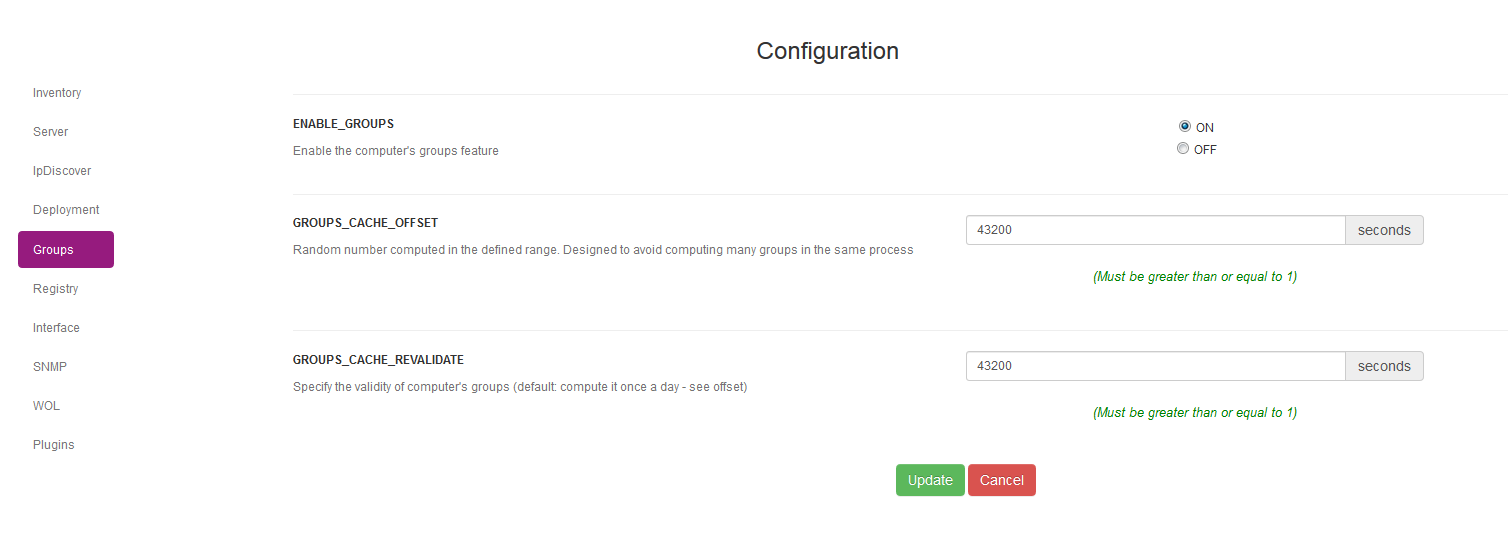
There, set the "ENABLE_GROUPS" parameter to "ON", and adjust the other parameters if needed.
The available parameters are:
- ENABLE_GROUPS: Enable or disable the computer's group feature;
- GROUPS_CACHE_OFFSET: This setting is used to add a random number of seconds to the "GROUPS_CACHE_REVALIDATE" to avoid computing many groups in the same process. See hereunder for more information;
- GROUPS_CACHE_REVALIDATE: To avoid excessive load on servers where a large number of dynamic groups is being used, groups' membership is cached and refreshed at regular interval. This setting specify the interval, in seconds, at which dynamic groups' cached data is refreshed. This interval is actualy increased at run time by a random number of seconds chosen between O and "GROUPS_CACHE_OFFSET" to avoid all dynamic groups being refreshed at the same time.
Viewing groups
To views the groups you created, click on the menu Inventory toolbar and then groups.
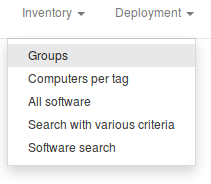
You can see three tabs:
- Dynamic Groups tab : to view the list of dynamic groups
- Static Groups tab : to view the list of static groups
- Server Groups tab : to view the list of redistribution server groups
Note : Restribution groups tab might be unavailable if you disabled redistributions server in the configuration
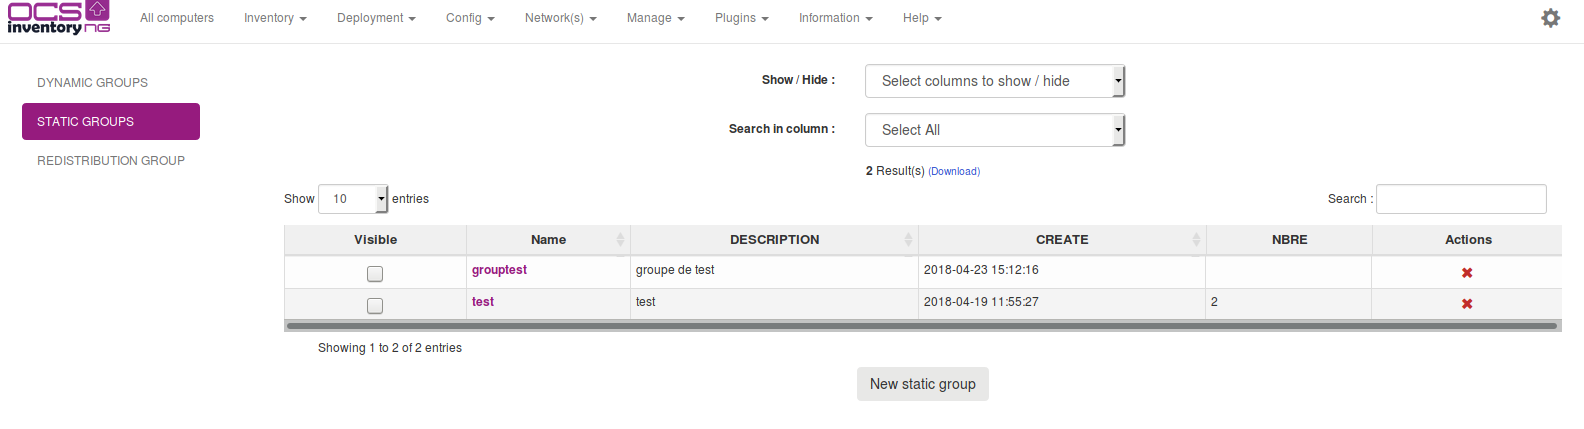
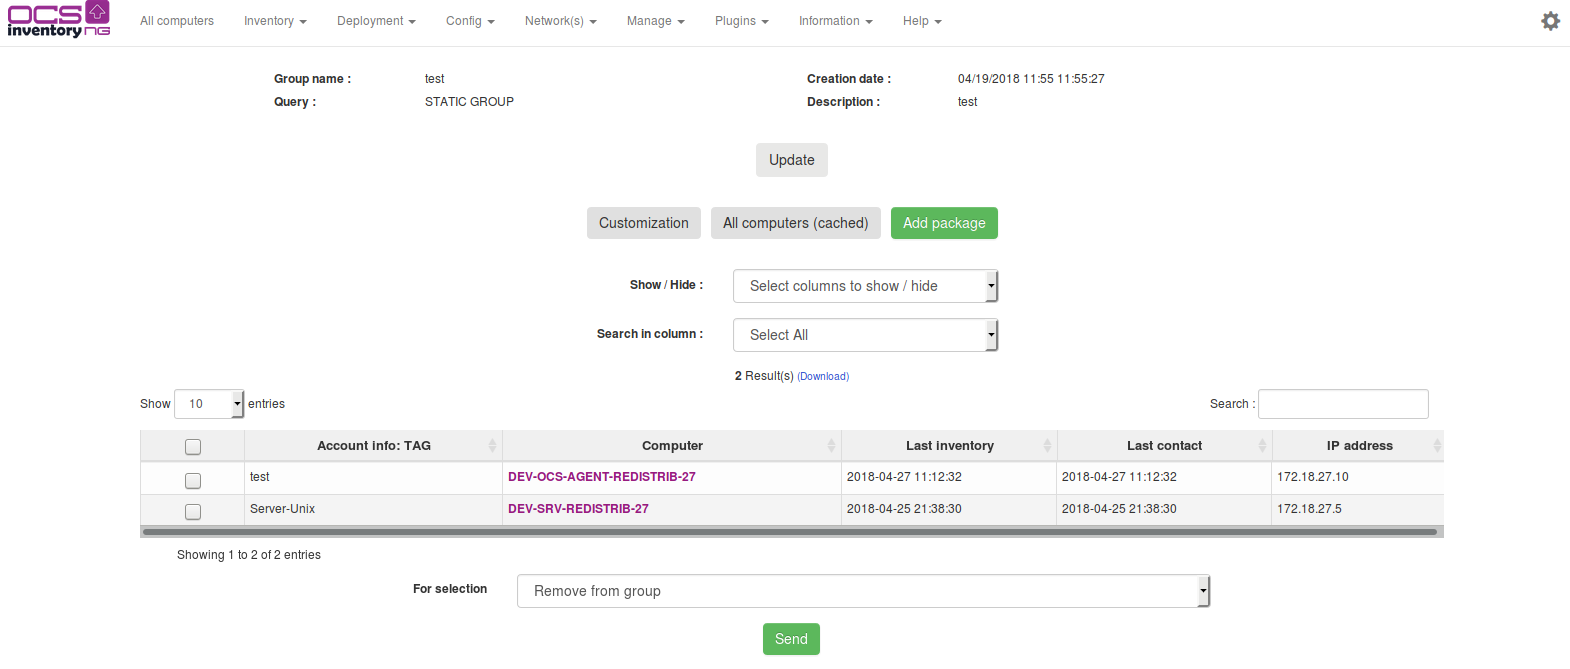
When you click on a group name, you go to the group page. In the top, you can see various informations about the group:
- Group name
- Creation date
- Query (the SQL query corresponding to the various criteria search parameters for dynamics groups)
- Description
You can edit the description and the group name by clicking on update.
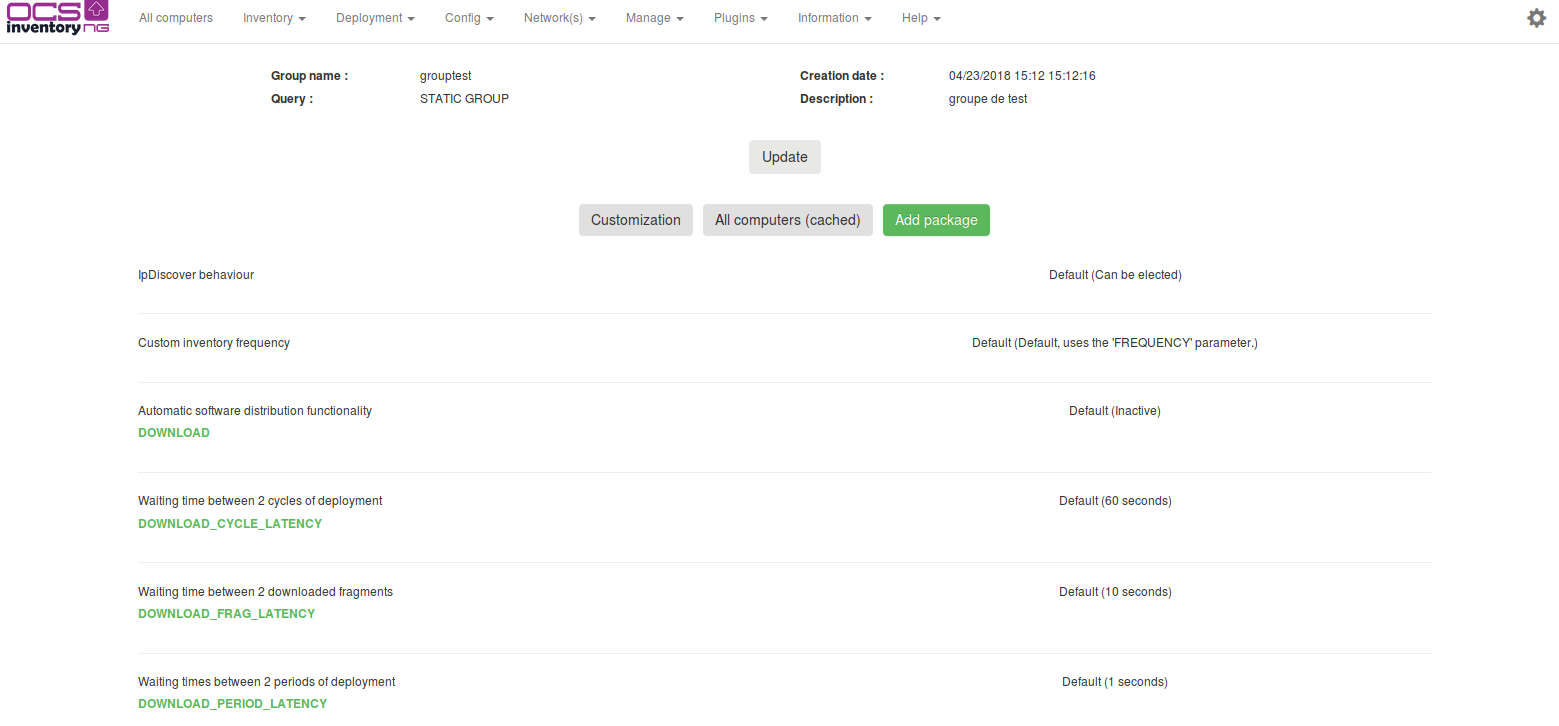
If you click on "All computers (cached)", you can see all the computers members of the group.
Setting up a recurring notification
As of version 2.11.0, a new "Notifications" tab has been added to the group detail page. Group reports can now be automatically generated and sent by email to one ore more recipients.
Notifications must be configured : Configure mail notifications
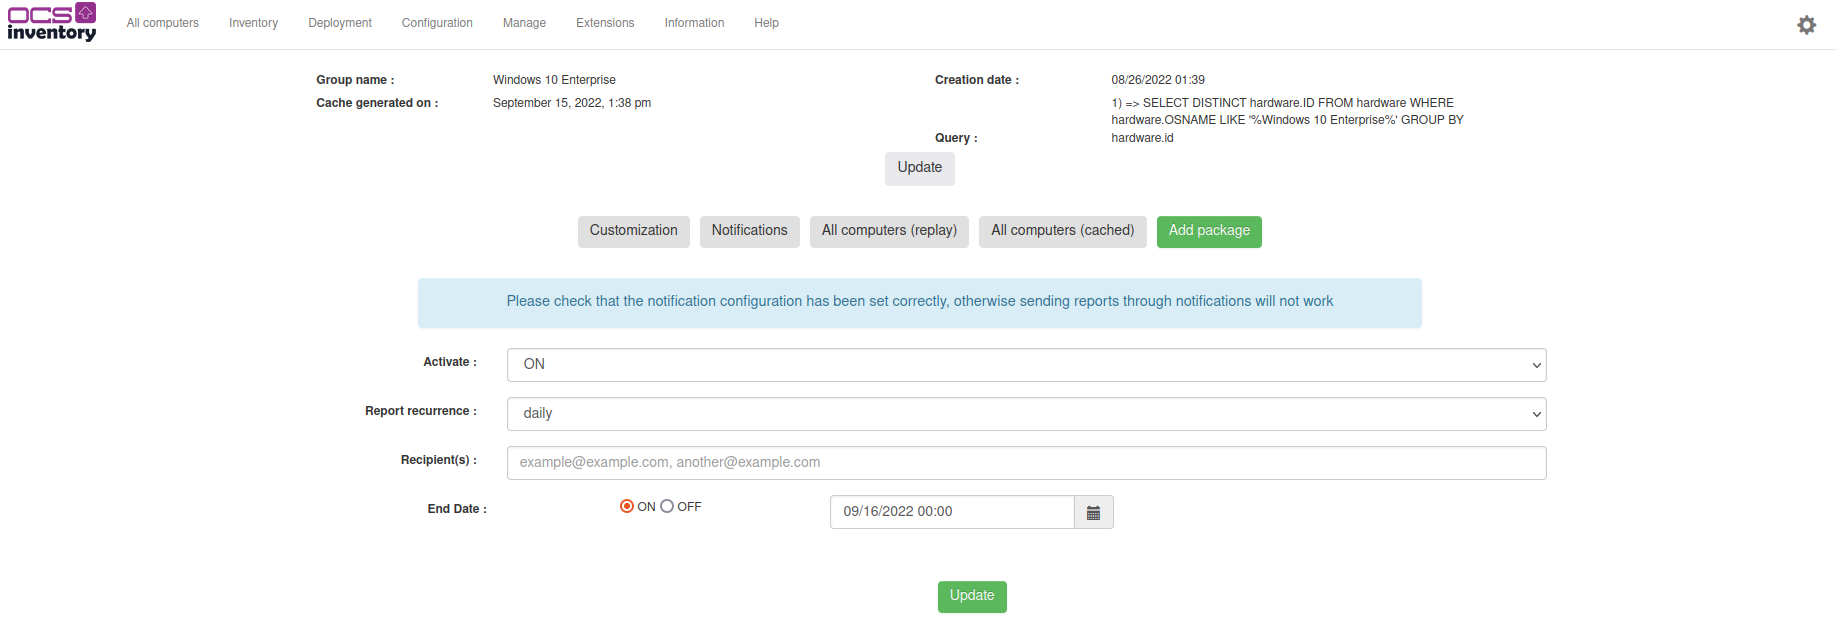
Options :
- Activate : ON / OFF (used to activate/desactivate an existing notification)
- Report recurrence : daily / weekly / monthly (weekly reports will prompt you to choose a weekday, in the case of a monthly report, notification will be sent every 1st of the month)
- Recipient(s) : needs to be completed, a unique recipient can be provided (e.g. example@example.com) or multiple if using the following syntax : example@example.com, another@example.com. Emails must be separated by a comma.
- End Date : ON / OFF (if set to ON, a date picker will be displayed, report will be sent until the date is reached)
Updating an existing group notification
Modifying the options fields for an already set up notification and hitting the 'Update' button will update the current report.
To desactivate/activate a group notification, use the Activate option.
Configuring a cron job
Reports are generated and sent by the cron_report_notification.php file. This script should be executed at a daily frequency, setting up a cron job for it :
0 5 * * * cd /usr/share/ocsinventory-reports/ocsreports/crontab/ && php cron_report_notification.php >> /var/log/OCS_group_notification.log
Script will be run at 5am everyday and output will be redirected to a log file.
Mail notification example
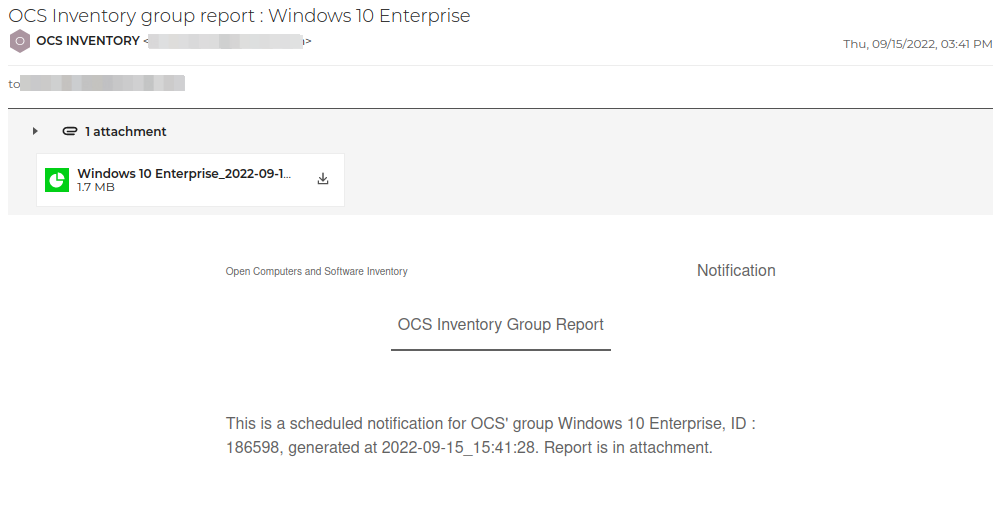
Report will be attached to the email, the group name is specified within the subject, and the group ID and generation date are included in the body.
Using static groups
Static groups of computers corresponds to the result of a various criteria search. For example, if you make a various criteria search which search all computers having Firefox, then all the computers that meet these criteria at this moment can be added to a static group. The content of a static group won't change until you manually add/remove computers to this group, even using another various criteria search.
Create a static group
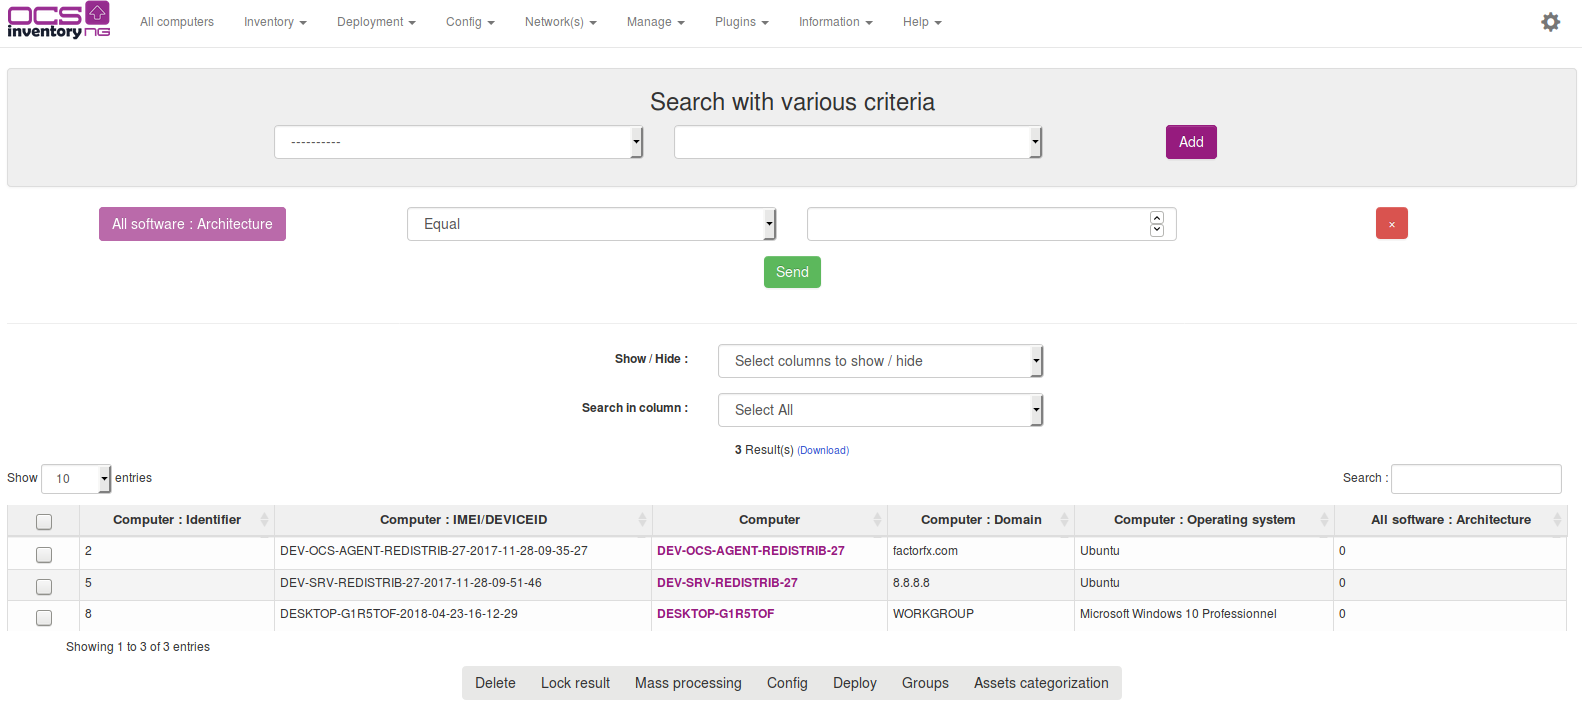
To create a static group of computers, you have to make a various criteria search first. Click on "Search with various criteria", select your parameters, and click on "Search" button. In the result table, check the computers you want to add to the static group (you can click on "the page" to select all the computers). Click on Groups at the bottom of the result table and select if you want to add what you selected (checkboxes) or for the request itself.
Now add informations in several fields:
- Name : enter the name of the group here
- Description: add a description of the group here (optional)
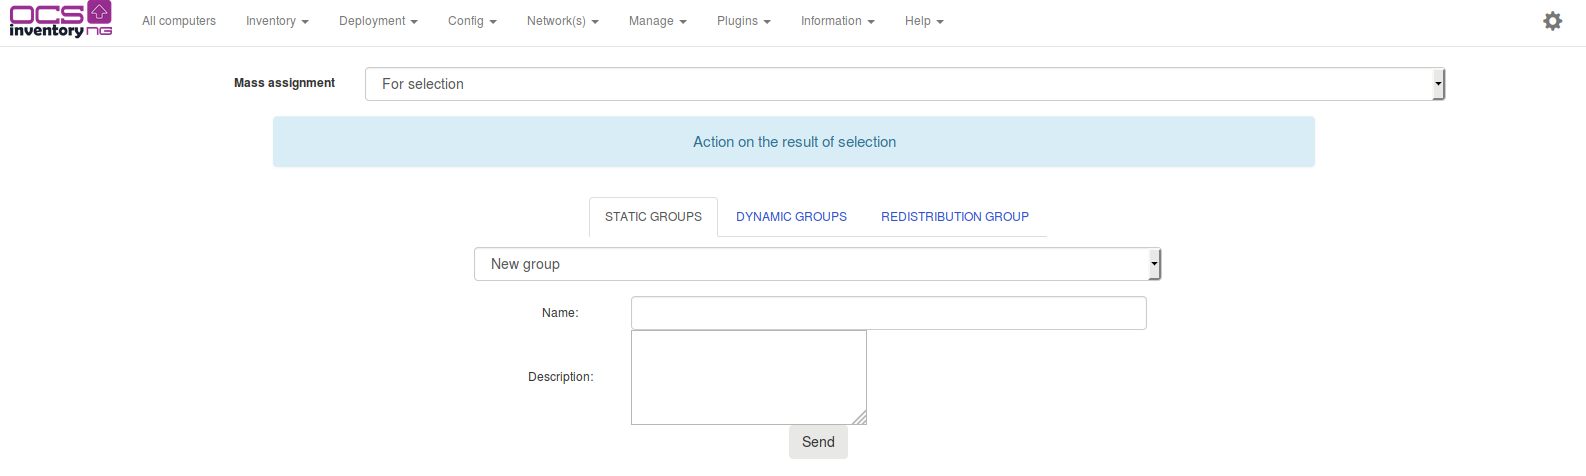
Now, you can view your new static group, as described before, by clicking "Groups" and "Static groups" tab.
Using dynamic groups
Dynamic groups of computers corresponds to the parameters you selected when you make a various criteria search. All computers meeting these criteria will enter in the dynamic computers group.
For example, if you make a various criteria search which selects all computers having Thunderbird, then all the computers that meet these criteria are added to the dynamic group. If you setup Thunderbird on another computer later, this computer WILL automatically enter in the dynamic group too when new inventory is done. Other case: if you uninstall Thunderbird from a computer, this computer will be automatically removed from the dynamic group, also when new inventory is done.
Create a dynamic group
To create a dynamic group of computers, you have to make a various criteria search first. Click on "Search with various criteria", select your parameters, and click on "Search" button.

Now, you can view your new dynamic group, as described before, by clicking "Groups" and "Dynamics groups" tab.
Remark: Dynamic group's membership is cached. See paragraph "Enabling computer's group feature" for more
 information about this.
Deploying packages on groups
As you can do with computers, you can deploy packages on groups. When you affect a package on a group, all the computers members this group will have this package affected automatically. You can affect packages on static and dynamics groups in the same way. When you affect a package on a dynamic group, all the computers that will be members of the dynamic group later will be affected automatically too.
Tip: With a such mechanism, you can even manage package dependencies.
For example, dynamic group of computers that have no Firefox are in the "no Firefox group". This group is associated with deployment of "FirefoxInstall" package. Another group is defined on the packages history: "FirefoxInstalled" group, that contains the computers having successfully setup Firefox. On this group, there is an associated package named "FirefoxPrivateExtensionXpi". When a new computer will check in, it will be added on the first group. As a member of this group, it will deploy Firefox. When it will check in with Firefox installed, it will be removed from the first group and included in the second group and will install the XPI extensions.
In the same way, you can setup computers profiles that will deploy in a given order all the software components associated to their profile.
Affect package on a group
Once you created and activated a package, you can affect this package to group. Go to the group page and click on Customization. In the right corner of array, click on the link Add Package.

As you do for a single computer, click now on icon ACTIONS in the right column and validate.
Now, your package is affected on your group and you can verify the affectation in the group custom parameters.

